Deviation Actions


Description
This is the blog that I originally found the eeyore pictures at: aphid777.deviantart.com/art/Ba…
Everything was Trial and error, if you have a questions, email me at shanea.estes@gmail.com and I’ll try to help you. Repeat anything between * until you reach your stitch marker again, number in () is how many stitches are in each round.
EDIT: I used Caron simply soft yarn. I picked a color close to what I thought eeyore looked like. I dont remember the specific color (possibly berry blue, i googled the yarn brand and that color looks like the one I used) I also used caron simply soft tan color (maybe light country peach??) And then I used scrap pink at the house for the bow. You can make the bow whatever color you'd like, though traditional color for eeyore is a pink color. I also used a size G or H hook, cant specifically remember. The larger the hook, the larger the toy will be since the space between each crochet stitch is slightly larger. Each hook size up increased the toy by 1-2 inches overall.
TW= turn work , MR= Magic ring, sc= single crochet, inc= increase (crochet two single crochets in one stitch), dec= decrease (combine two stitches into one)
Body
Rnd 1- Magic Ring 6 (youtube magic ring and it will show you this stitch)
Rnd 2- Inc (12)
Rnd 3- *sc, inc* (18)
Rnd 4- *sc in next 2, inc*(24)
Rnd 5 - *sc in next 3, inc* (30)
Rnd 6 - *sc in next 4, inc* (36)
Rnd 7- *sc in next 5, inc* (42)
Rnd 8- *sc in next 6, inc* (48)
Rnd 9- *sc in next 23, inc* (50)
Rnd 10- *sc in next 24, inc* (52)
Rnd 11- *sc in next 25, inc* (54)
Rnd 12- *sc in next 25, dec* (52)
Rnd 13- sc 52 (52)
Rnd 14- *sc in next 24, dec* (50)
Rnd 15- sc 50 (50)
Rnd 16 - *sc in next 23, dec* (48)
Rnd 17- *sc in next 22, dec* (46)
Rnd 18- *sc in next 21, dec* (44)
Rnd 19- * sc in next 20, dec* (42)
Rnd 20- *sc in next 19, dec* (40)
Rnd 21- *sc in next 18, dec* (38)
Rnd 22- *sc in next 17, dec* (36)
Rnd 23- *sc in next 16, dec* (34)
Rnd 24- *sc in next 6, dec, sc in next 7, dec* (30)
--Firmly stuff--
Rnd 25- *sc in next 3, dec* (24)
Rnd 26- *sc in next 2, dec*(18)
Rnd 27- *sc, dec* (12)
Rnd 28- *dec in every stitch* (6)
Fasten off, finishing stuffing and Leave 12” tail to sew whole closed.
Head
Start with Cream colored yarn
Rnd 1- MR6
Rnd 2- *Inc* (12)
Rnd 3- *sc, inc* (18)
Rnd 4- *sc in next 2, inc* (24)
Rnd 5- *sc in next 5, inc* (28)
Rnd 6- *sc in next 13, inc* (30)
Rnd 7- *sc in next 14, inc* (32)
Rnd 8- *sc in next 15, inc* (34)
Rnd 9- *sc in next 16, inc* (36)
Rnd 10- sc 36 (36)
---Switch to blue yarn---
Rnd 11- sc 36 (36)
Rnd 12- *sc in the next 7, dec* (32)
Rnd 13- sc 32 (32)
Rnd 14- *sc in next 13, dec* (30)
Rnd 15- *sc in next 12, dec* (28)
Rnd 16- *sc in next 13, inc* (30)
Rnd 17 and 18- sc 30 (30)
Rnd 19- *sc in next 13, dec* (28)
Rnd 20- *sc in next 12, dec* (26)
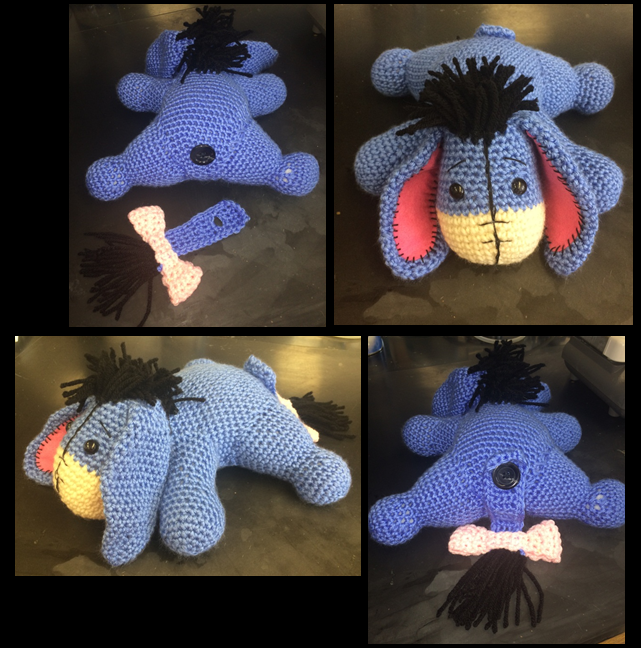
--Attach 12mm safety eyes between rows 12 and 13. Places them about 6 stitches apart—
--Firmly stuff--
Rnd 21- *sc in next 11, dec* (24)
Rnd 22- *sc in next 2, dec* (18)
Rnd 23- *sc, dec* (12)
Rnd 24- dec (6)
Fasten off, Finishing Stuffing, and Leave 12” tail to sew the whole together. Using embroidery thread, embroider all the way around the center of his head, half way between safety eyes or he will look funny. (see pictures). In the cream, do two horizontal lines that reach out two stiches on each side of the center line and make them about 2 rows apart.
Eye browns are embroidered on about 1 row above the top of the safety eyes( around row 15). The bottom of the eye brow is about 2 stitches outside of eye and the angle spans up 2 rows and over 3 stitches so that it is about even with the inner edge of the eye. (see pictures)
Back Legs (make 2)
Rnd 1- MR 6
Rnd 2- Inc (12)
Rnd 3- *sc, inc* (18)
Rnd 4- *sc in next 2, inc* (24)
Rnd 5- sc 24 (24)
Rnd 6- *sc in next 10, dec* (22)
Rnd 7- *sc in next 3, dec, sc in next 4, dec* (18)
Rnd 8- *sc in 2, dec, sc in next 3, dec* (14)
Rnd 9- *sc in next 2, inc, sc in next 3, inc* (18)
Rnd 10- *sc in next 3, inc, sc in next 4, inc* (22)
Rnd 11- *sc in next 10, inc* (24)
Rnd 12- *sc in next 11, inc* (26)
Rnd 13- *sc in next 12, inc* (28)
Rnd 14- *sc in next 13, inc* (30)
Rnd 15- *sc in next 14, inc* (32)
Rnd 16- *sc in next 15, inc* (34)
Rnd 17- *sc in next 16, inc* (36),
Fasten off and leave a 24” tail to sew leg to body. Stuff firmly and shape the foot. Attach to the body between rows 3 and 15. One side of leg should be attached near row 3 while the other side should naturally reach around row 15. Attach the top side of the leg opening barely higher than midline of the body, you don’t want his legs to point toward the sky.
Front Legs (make 2)
Rnd 1- MR 6
Rnd 2- Inc (12)
Rnd 3- *sc, inc* (18)
Rnd 4- *sc in next 2, inc* (24)
Rnd 5-7- sc 24 (24)
Rnd 8- *sc in next 4, dec* (20)
Rnd 9- *sc in next 8, dec* ( 18)
Rnd 10- *sc in next 2, dec, sc in next 3, dec* (14)
Rnd 11- *sc in next 2, inc, sc in next 3, inc* (18)
Rnd 12- *sc in next 8, inc* (20)
Rnd 13 and 14- sc 20 (20)
Rnd 15- *sc in next 9, inc* (22)
Rnd 16- *sc in next 12, inc* (24)
Rnd 17- sc 24 (24)
Fasten off and leave 18” to sew onto body. Stuff firmly. Attach back opening of leg to round 18 and front of leg opening should naturally fall near row 26 on the body. Place the top of the leg opening a bit over the midline of the body so that the arms point down and not towards the sky.
Whip stitch the head to the body at an angle that helps keep the body sitting so that all four legs touch the ground. Round 1 of the head will probably not touch the ground at the angle that you sew the head onto the body.
Ears (make 2)
Rnd 1- MR 6
Rnd 2- *sc in next 1, inc* (9)
Rnd 3- *sc in next 2, inc* (12)
Rnd 4- sc 12 (12)
Rnd 5- *sc in next 3, inc* (15)
Rnd 6- sc 15 (15)
Rnd 7- *sc in next 4, inc* (18)
Rnd 8- sc 18 (18)
Rnd 9-*sc in next 8, inc* (20)
Rnd 10- sc 20 (20)
Rnd 11- *sc in next 9, inc* (22)
Rnd 12- sc 22 (22)
Rnd 13- *sc in next 9, dec* (20)
Rnd 14 and 15- sc 20 (20)
Rnd 16- *sc in next 8, dec* (18)
Rnd 17- sc 18
Rnd 18- *sc 4, dec* (15)
Rnd 19- sc 15
Rnd 20- *sc 3, dec* (12)
Rnd 21- *sc 4, dec* (10)
Rnd 22- sc 10
Fasten off leaving a 12” tail. When you attach the ears to the top of the head, make sure you whip stitch between both the front and back stitches. DO NOT STUFF ears. When the ears are flattened, there should be 5 stitches that are doubled from being stitched through the front and back of the rounds. Attach ears near round 20/21.
Tail
Row 1- Chain 5
Row 2- sc in second chain from hook and all the way across (4)
Row 3- TW, sc 4 (4)
Row 4- TW, sc1, chain 2, sc 1. (4)
--You chain two to start the hole in the tail so that it can be slipped on a button that will be attached to the body—
Row 5- TW, sc1, sc the next two stitches around the chain 2 from the previous step, sc 1 (4)
Row 6-8- TW, sc 4 (4)
Row 9- TW, sc 1, dec, sc1 (3)
Row 10-15- TW, sc 3 (3)
Row 16 will be a single crochet around the entire tail to make a border. You will inc in all four corners. -> Inc (in corner stitch), sc evenly up rows 15-1, Inc (in corner stitch), sc across 4 stitches at the top of the tail, inc (in corner stitch), sc evenly down rows 1-15, inc (in corner stitch), sc in 3 stitches at the bottom of the tail. Fasten off and weave in end.
With the border, it now looks like there is a front and back of the tail. You will take black yarn and cut it into about 6” strips. You latch hook the strips to the 3 stitch end of the tail (over top of the border is fine). I placed about 15 of the 6 inch pieces onto the tail. This made it plush. I did a row of latch hook pieces in the first row and another row of latch hook in the second row.
Bow
Use pink yarn
This pattern is continuous and then its folded over and sewn together around the 3 stitch end of the tail after the hair is attached to the tail.
Row 1- Chain 3
Row 2- sc in 2nd chain from hook (2)
Row 3- TW, sc 2 (2)
Row 4- TW, sc 2 (2)
Row 5- TW, sc 2 (2)
Row 6- TW, sc1, inc (3)
Row 7- TW, sc 3 (3)
Row 8- TW, sc 1, inc, sc 1 (4)
Row 9- TW, sc 4 (4)
Row 10- TW, sc 2, inc, sc 1 (5)
Row 11-12- TW sc 5
Row 13- TW, sc 2, dec, sc 1 (4)
Row 14- TW, sc 4 (4)
Row 15- TW, sc 1, dec, sc 1 (3)
Row 16- TW, sc 3 (3)
Row 17- TW, dec, sc (2)
Row 18-22- TW, sc 2 (2)
Row 23- TW, sc1, inc (3)
Row 24- TW, sc 3 (3)
Row 25- TW, sc 1, inc, sc 1 (4)
Row 26- TW, sc 4 (4)
Row 27- TW, sc 2, inc, sc 1 (5)
Row 28-29- TW sc 5
Row 30- TW, sc 2, dec, sc 1 (4)
Row 31- TW, sc 4 (4)
Row 32- TW, sc 1, dec, sc 1 (3)
Row 33- TW, sc 3 (3)
Row 34- TW, dec, sc (2)
-- Attach row 34 to row 1—The skinny areas should line up on top of one another and be 6 rows long. This is the area you place the tail in and sew through the top of the bow, the tail, and the bottom of the bow to secure the bow to the tail. Make sure you place it close to the bottom of the tail so that you cant see where you latch hooked the hair onto the tail.—
Finishing Directions
The main is made of 4” of black yarn that is latch hooked onto the head. The first row I latch hooked 3 pieces. The following rows to about 3 rows onto the body from where the head was attached had 4-5 pieces latch hooked. I totaled ~45 pieces. Add more or less to make the mane plush.
I embroidered pink felt that I free hand cut to be about 1 cm within all the edges of the ears. I whip stitched it onto one side of the ear. Since the ear is round but pressed flat, make sure you only whip stich the felt to one part of the double lined crocheted ear.
I attached a Quarter sized black button to the but around row 7-8 directly center between the back legs.
Can’t find the pattern can you post the pattern